
File size: 17,842 Bytes
c0af20c |
1 2 3 4 5 6 7 8 9 10 11 12 13 14 15 16 17 18 19 20 21 22 23 24 25 26 27 28 29 30 31 32 33 34 35 36 37 38 39 40 41 42 43 44 45 46 47 48 49 50 51 52 53 54 55 56 57 58 59 60 61 62 63 64 65 66 67 68 69 70 71 72 73 74 75 76 77 78 79 80 81 82 83 84 85 86 87 88 89 90 91 92 93 94 95 96 97 98 99 100 101 102 103 104 105 106 107 108 109 110 111 112 113 114 115 116 117 118 119 120 121 122 123 124 125 126 127 128 129 130 131 132 133 134 135 136 137 138 139 140 141 142 143 144 145 146 147 148 149 150 151 152 153 154 155 156 157 158 159 160 161 162 163 164 165 166 167 168 169 170 171 172 173 174 175 176 177 178 179 180 181 182 183 184 185 186 187 188 189 190 191 192 193 194 195 196 197 198 199 200 201 202 203 204 205 206 207 208 209 210 211 212 213 214 215 216 217 218 219 220 221 222 223 224 225 226 227 228 229 230 231 232 233 234 235 236 237 238 239 240 241 242 243 244 245 246 247 248 249 250 251 252 253 254 255 256 257 258 259 260 261 262 263 264 265 266 267 268 269 270 271 272 273 274 275 276 277 278 279 280 281 282 283 284 285 286 287 288 289 290 291 292 293 294 295 296 297 298 299 300 301 302 303 304 305 306 307 308 309 310 311 312 313 314 315 316 317 318 319 320 321 322 323 324 325 326 327 328 329 330 331 332 333 334 335 336 337 338 339 340 341 342 343 344 345 346 347 348 349 350 351 352 353 354 355 356 357 |
<!--Copyright 2023 The HuggingFace Team. All rights reserved.
Licensed under the Apache License, Version 2.0 (the "License"); you may not use this file except in compliance with
the License. You may obtain a copy of the License at
http://www.apache.org/licenses/LICENSE-2.0
Unless required by applicable law or agreed to in writing, software distributed under the License is distributed on
an "AS IS" BASIS, WITHOUT WARRANTIES OR CONDITIONS OF ANY KIND, either express or implied. See the License for the
specific language governing permissions and limitations under the License.
-->
# Low-Rank Adaptation of Large Language Models (LoRA)
<Tip warning={true}>
This is an experimental feature. Its APIs can change in future.
</Tip>
[Low-Rank Adaptation of Large Language Models (LoRA)](https://arxiv.org/abs/2106.09685) is a training method that accelerates the training of large models while consuming less memory. It adds pairs of rank-decomposition weight matrices (called **update matrices**) to existing weights, and **only** trains those newly added weights. This has a couple of advantages:
- Previous pretrained weights are kept frozen so the model is not as prone to [catastrophic forgetting](https://www.pnas.org/doi/10.1073/pnas.1611835114).
- Rank-decomposition matrices have significantly fewer parameters than the original model, which means that trained LoRA weights are easily portable.
- LoRA matrices are generally added to the attention layers of the original model. 🧨 Diffusers provides the [`~diffusers.loaders.UNet2DConditionLoadersMixin.load_attn_procs`] method to load the LoRA weights into a model's attention layers. You can control the extent to which the model is adapted toward new training images via a `scale` parameter.
- The greater memory-efficiency allows you to run fine-tuning on consumer GPUs like the Tesla T4, RTX 3080 or even the RTX 2080 Ti! GPUs like the T4 are free and readily accessible in Kaggle or Google Colab notebooks.
<Tip>
💡 LoRA is not only limited to attention layers. The authors found that amending
the attention layers of a language model is sufficient to obtain good downstream performance with great efficiency. This is why it's common to just add the LoRA weights to the attention layers of a model. Check out the [Using LoRA for efficient Stable Diffusion fine-tuning](https://huggingface.co/blog/lora) blog for more information about how LoRA works!
</Tip>
[cloneofsimo](https://github.com/cloneofsimo) was the first to try out LoRA training for Stable Diffusion in the popular [lora](https://github.com/cloneofsimo/lora) GitHub repository. 🧨 Diffusers now supports finetuning with LoRA for [text-to-image generation](https://github.com/huggingface/diffusers/tree/main/examples/text_to_image#training-with-lora) and [DreamBooth](https://github.com/huggingface/diffusers/tree/main/examples/dreambooth#training-with-low-rank-adaptation-of-large-language-models-lora). This guide will show you how to do both.
If you'd like to store or share your model with the community, login to your Hugging Face account (create [one](hf.co/join) if you don't have one already):
```bash
huggingface-cli login
```
## Text-to-image
Finetuning a model like Stable Diffusion, which has billions of parameters, can be slow and difficult. With LoRA, it is much easier and faster to finetune a diffusion model. It can run on hardware with as little as 11GB of GPU RAM without resorting to tricks such as 8-bit optimizers.
### Training[[text-to-image-training]]
Let's finetune [`stable-diffusion-v1-5`](https://huggingface.co/runwayml/stable-diffusion-v1-5) on the [Pokémon BLIP captions](https://huggingface.co/datasets/lambdalabs/pokemon-blip-captions) dataset to generate your own Pokémon.
Specify the `MODEL_NAME` environment variable (either a Hub model repository id or a path to the directory containing the model weights) and pass it to the [`pretrained_model_name_or_path`](https://huggingface.co/docs/diffusers/en/api/diffusion_pipeline#diffusers.DiffusionPipeline.from_pretrained.pretrained_model_name_or_path) argument. You'll also need to set the `DATASET_NAME` environment variable to the name of the dataset you want to train on. To use your own dataset, take a look at the [Create a dataset for training](create_dataset) guide.
The `OUTPUT_DIR` and `HUB_MODEL_ID` variables are optional and specify where to save the model to on the Hub:
```bash
export MODEL_NAME="runwayml/stable-diffusion-v1-5"
export OUTPUT_DIR="/sddata/finetune/lora/pokemon"
export HUB_MODEL_ID="pokemon-lora"
export DATASET_NAME="lambdalabs/pokemon-blip-captions"
```
There are some flags to be aware of before you start training:
* `--push_to_hub` stores the trained LoRA embeddings on the Hub.
* `--report_to=wandb` reports and logs the training results to your Weights & Biases dashboard (as an example, take a look at this [report](https://wandb.ai/pcuenq/text2image-fine-tune/runs/b4k1w0tn?workspace=user-pcuenq)).
* `--learning_rate=1e-04`, you can afford to use a higher learning rate than you normally would with LoRA.
Now you're ready to launch the training (you can find the full training script [here](https://github.com/huggingface/diffusers/blob/main/examples/text_to_image/train_text_to_image_lora.py)). Training takes about 5 hours on a 2080 Ti GPU with 11GB of RAM, and it'll create and save model checkpoints and the `pytorch_lora_weights` in your repository.
```bash
accelerate launch --mixed_precision="fp16" train_text_to_image_lora.py \
--pretrained_model_name_or_path=$MODEL_NAME \
--dataset_name=$DATASET_NAME \
--dataloader_num_workers=8 \
--resolution=512 --center_crop --random_flip \
--train_batch_size=1 \
--gradient_accumulation_steps=4 \
--max_train_steps=15000 \
--learning_rate=1e-04 \
--max_grad_norm=1 \
--lr_scheduler="cosine" --lr_warmup_steps=0 \
--output_dir=${OUTPUT_DIR} \
--push_to_hub \
--hub_model_id=${HUB_MODEL_ID} \
--report_to=wandb \
--checkpointing_steps=500 \
--validation_prompt="A pokemon with blue eyes." \
--seed=1337
```
### Inference[[text-to-image-inference]]
Now you can use the model for inference by loading the base model in the [`StableDiffusionPipeline`] and then the [`DPMSolverMultistepScheduler`]:
```py
>>> import torch
>>> from diffusers import StableDiffusionPipeline, DPMSolverMultistepScheduler
>>> model_base = "runwayml/stable-diffusion-v1-5"
>>> pipe = StableDiffusionPipeline.from_pretrained(model_base, torch_dtype=torch.float16)
>>> pipe.scheduler = DPMSolverMultistepScheduler.from_config(pipe.scheduler.config)
```
Load the LoRA weights from your finetuned model *on top of the base model weights*, and then move the pipeline to a GPU for faster inference. When you merge the LoRA weights with the frozen pretrained model weights, you can optionally adjust how much of the weights to merge with the `scale` parameter:
<Tip>
💡 A `scale` value of `0` is the same as not using your LoRA weights and you're only using the base model weights, and a `scale` value of `1` means you're only using the fully finetuned LoRA weights. Values between `0` and `1` interpolates between the two weights.
</Tip>
```py
>>> pipe.unet.load_attn_procs(lora_model_path)
>>> pipe.to("cuda")
# use half the weights from the LoRA finetuned model and half the weights from the base model
>>> image = pipe(
... "A pokemon with blue eyes.", num_inference_steps=25, guidance_scale=7.5, cross_attention_kwargs={"scale": 0.5}
... ).images[0]
# use the weights from the fully finetuned LoRA model
>>> image = pipe("A pokemon with blue eyes.", num_inference_steps=25, guidance_scale=7.5).images[0]
>>> image.save("blue_pokemon.png")
```
<Tip>
If you are loading the LoRA parameters from the Hub and if the Hub repository has
a `base_model` tag (such as [this](https://huggingface.co/sayakpaul/sd-model-finetuned-lora-t4/blob/main/README.md?code=true#L4)), then
you can do:
```py
from huggingface_hub.repocard import RepoCard
lora_model_id = "sayakpaul/sd-model-finetuned-lora-t4"
card = RepoCard.load(lora_model_id)
base_model_id = card.data.to_dict()["base_model"]
pipe = StableDiffusionPipeline.from_pretrained(base_model_id, torch_dtype=torch.float16)
...
```
</Tip>
## DreamBooth
[DreamBooth](https://arxiv.org/abs/2208.12242) is a finetuning technique for personalizing a text-to-image model like Stable Diffusion to generate photorealistic images of a subject in different contexts, given a few images of the subject. However, DreamBooth is very sensitive to hyperparameters and it is easy to overfit. Some important hyperparameters to consider include those that affect the training time (learning rate, number of training steps), and inference time (number of steps, scheduler type).
<Tip>
💡 Take a look at the [Training Stable Diffusion with DreamBooth using 🧨 Diffusers](https://huggingface.co/blog/dreambooth) blog for an in-depth analysis of DreamBooth experiments and recommended settings.
</Tip>
### Training[[dreambooth-training]]
Let's finetune [`stable-diffusion-v1-5`](https://huggingface.co/runwayml/stable-diffusion-v1-5) with DreamBooth and LoRA with some 🐶 [dog images](https://drive.google.com/drive/folders/1BO_dyz-p65qhBRRMRA4TbZ8qW4rB99JZ). Download and save these images to a directory. To use your own dataset, take a look at the [Create a dataset for training](create_dataset) guide.
To start, specify the `MODEL_NAME` environment variable (either a Hub model repository id or a path to the directory containing the model weights) and pass it to the [`pretrained_model_name_or_path`](https://huggingface.co/docs/diffusers/en/api/diffusion_pipeline#diffusers.DiffusionPipeline.from_pretrained.pretrained_model_name_or_path) argument. You'll also need to set `INSTANCE_DIR` to the path of the directory containing the images.
The `OUTPUT_DIR` variables is optional and specifies where to save the model to on the Hub:
```bash
export MODEL_NAME="runwayml/stable-diffusion-v1-5"
export INSTANCE_DIR="path-to-instance-images"
export OUTPUT_DIR="path-to-save-model"
```
There are some flags to be aware of before you start training:
* `--push_to_hub` stores the trained LoRA embeddings on the Hub.
* `--report_to=wandb` reports and logs the training results to your Weights & Biases dashboard (as an example, take a look at this [report](https://wandb.ai/pcuenq/text2image-fine-tune/runs/b4k1w0tn?workspace=user-pcuenq)).
* `--learning_rate=1e-04`, you can afford to use a higher learning rate than you normally would with LoRA.
Now you're ready to launch the training (you can find the full training script [here](https://github.com/huggingface/diffusers/blob/main/examples/dreambooth/train_dreambooth_lora.py)). The script creates and saves model checkpoints and the `pytorch_lora_weights.bin` file in your repository.
It's also possible to additionally fine-tune the text encoder with LoRA. This, in most cases, leads
to better results with a slight increase in the compute. To allow fine-tuning the text encoder with LoRA,
specify the `--train_text_encoder` while launching the `train_dreambooth_lora.py` script.
```bash
accelerate launch train_dreambooth_lora.py \
--pretrained_model_name_or_path=$MODEL_NAME \
--instance_data_dir=$INSTANCE_DIR \
--output_dir=$OUTPUT_DIR \
--instance_prompt="a photo of sks dog" \
--resolution=512 \
--train_batch_size=1 \
--gradient_accumulation_steps=1 \
--checkpointing_steps=100 \
--learning_rate=1e-4 \
--report_to="wandb" \
--lr_scheduler="constant" \
--lr_warmup_steps=0 \
--max_train_steps=500 \
--validation_prompt="A photo of sks dog in a bucket" \
--validation_epochs=50 \
--seed="0" \
--push_to_hub
```
### Inference[[dreambooth-inference]]
Now you can use the model for inference by loading the base model in the [`StableDiffusionPipeline`]:
```py
>>> import torch
>>> from diffusers import StableDiffusionPipeline
>>> model_base = "runwayml/stable-diffusion-v1-5"
>>> pipe = StableDiffusionPipeline.from_pretrained(model_base, torch_dtype=torch.float16)
```
Load the LoRA weights from your finetuned DreamBooth model *on top of the base model weights*, and then move the pipeline to a GPU for faster inference. When you merge the LoRA weights with the frozen pretrained model weights, you can optionally adjust how much of the weights to merge with the `scale` parameter:
<Tip>
💡 A `scale` value of `0` is the same as not using your LoRA weights and you're only using the base model weights, and a `scale` value of `1` means you're only using the fully finetuned LoRA weights. Values between `0` and `1` interpolates between the two weights.
</Tip>
```py
>>> pipe.unet.load_attn_procs(lora_model_path)
>>> pipe.to("cuda")
# use half the weights from the LoRA finetuned model and half the weights from the base model
>>> image = pipe(
... "A picture of a sks dog in a bucket.",
... num_inference_steps=25,
... guidance_scale=7.5,
... cross_attention_kwargs={"scale": 0.5},
... ).images[0]
# use the weights from the fully finetuned LoRA model
>>> image = pipe("A picture of a sks dog in a bucket.", num_inference_steps=25, guidance_scale=7.5).images[0]
>>> image.save("bucket-dog.png")
```
If you used `--train_text_encoder` during training, then use `pipe.load_lora_weights()` to load the LoRA
weights. For example:
```python
from huggingface_hub.repocard import RepoCard
from diffusers import StableDiffusionPipeline
import torch
lora_model_id = "sayakpaul/dreambooth-text-encoder-test"
card = RepoCard.load(lora_model_id)
base_model_id = card.data.to_dict()["base_model"]
pipe = StableDiffusionPipeline.from_pretrained(base_model_id, torch_dtype=torch.float16)
pipe = pipe.to("cuda")
pipe.load_lora_weights(lora_model_id)
image = pipe("A picture of a sks dog in a bucket", num_inference_steps=25).images[0]
```
<Tip>
If your LoRA parameters involve the UNet as well as the Text Encoder, then passing
`cross_attention_kwargs={"scale": 0.5}` will apply the `scale` value to both the UNet
and the Text Encoder.
</Tip>
Note that the use of [`~diffusers.loaders.LoraLoaderMixin.load_lora_weights`] is preferred to [`~diffusers.loaders.UNet2DConditionLoadersMixin.load_attn_procs`] for loading LoRA parameters. This is because
[`~diffusers.loaders.LoraLoaderMixin.load_lora_weights`] can handle the following situations:
* LoRA parameters that don't have separate identifiers for the UNet and the text encoder (such as [`"patrickvonplaten/lora_dreambooth_dog_example"`](https://huggingface.co/patrickvonplaten/lora_dreambooth_dog_example)). So, you can just do:
```py
pipe.load_lora_weights(lora_model_path)
```
* LoRA parameters that have separate identifiers for the UNet and the text encoder such as: [`"sayakpaul/dreambooth"`](https://huggingface.co/sayakpaul/dreambooth).
**Note** that it is possible to provide a local directory path to [`~diffusers.loaders.LoraLoaderMixin.load_lora_weights`] as well as [`~diffusers.loaders.UNet2DConditionLoadersMixin.load_attn_procs`]. To know about the supported inputs,
refer to the respective docstrings.
## Unloading LoRA parameters
You can call [`~diffusers.loaders.LoraLoaderMixin.unload_lora_weights`] on a pipeline to unload the LoRA parameters.
## Supporting A1111 themed LoRA checkpoints from Diffusers
This support was made possible because of our amazing contributors: [@takuma104](https://github.com/takuma104) and [@isidentical](https://github.com/isidentical).
To provide seamless interoperability with A1111 to our users, we support loading A1111 formatted
LoRA checkpoints using [`~diffusers.loaders.LoraLoaderMixin.load_lora_weights`] in a limited capacity.
In this section, we explain how to load an A1111 formatted LoRA checkpoint from [CivitAI](https://civitai.com/)
in Diffusers and perform inference with it.
First, download a checkpoint. We'll use
[this one](https://civitai.com/models/13239/light-and-shadow) for demonstration purposes.
```bash
wget https://civitai.com/api/download/models/15603 -O light_and_shadow.safetensors
```
Next, we initialize a [`~DiffusionPipeline`]:
```python
import torch
from diffusers import StableDiffusionPipeline, DPMSolverMultistepScheduler
pipeline = StableDiffusionPipeline.from_pretrained(
"gsdf/Counterfeit-V2.5", torch_dtype=torch.float16, safety_checker=None
).to("cuda")
pipeline.scheduler = DPMSolverMultistepScheduler.from_config(
pipeline.scheduler.config, use_karras_sigmas=True
)
```
We then load the checkpoint downloaded from CivitAI:
```python
pipeline.load_lora_weights(".", weight_name="light_and_shadow.safetensors")
```
<Tip warning={true}>
If you're loading a checkpoint in the `safetensors` format, please ensure you have `safetensors` installed.
</Tip>
And then it's time for running inference:
```python
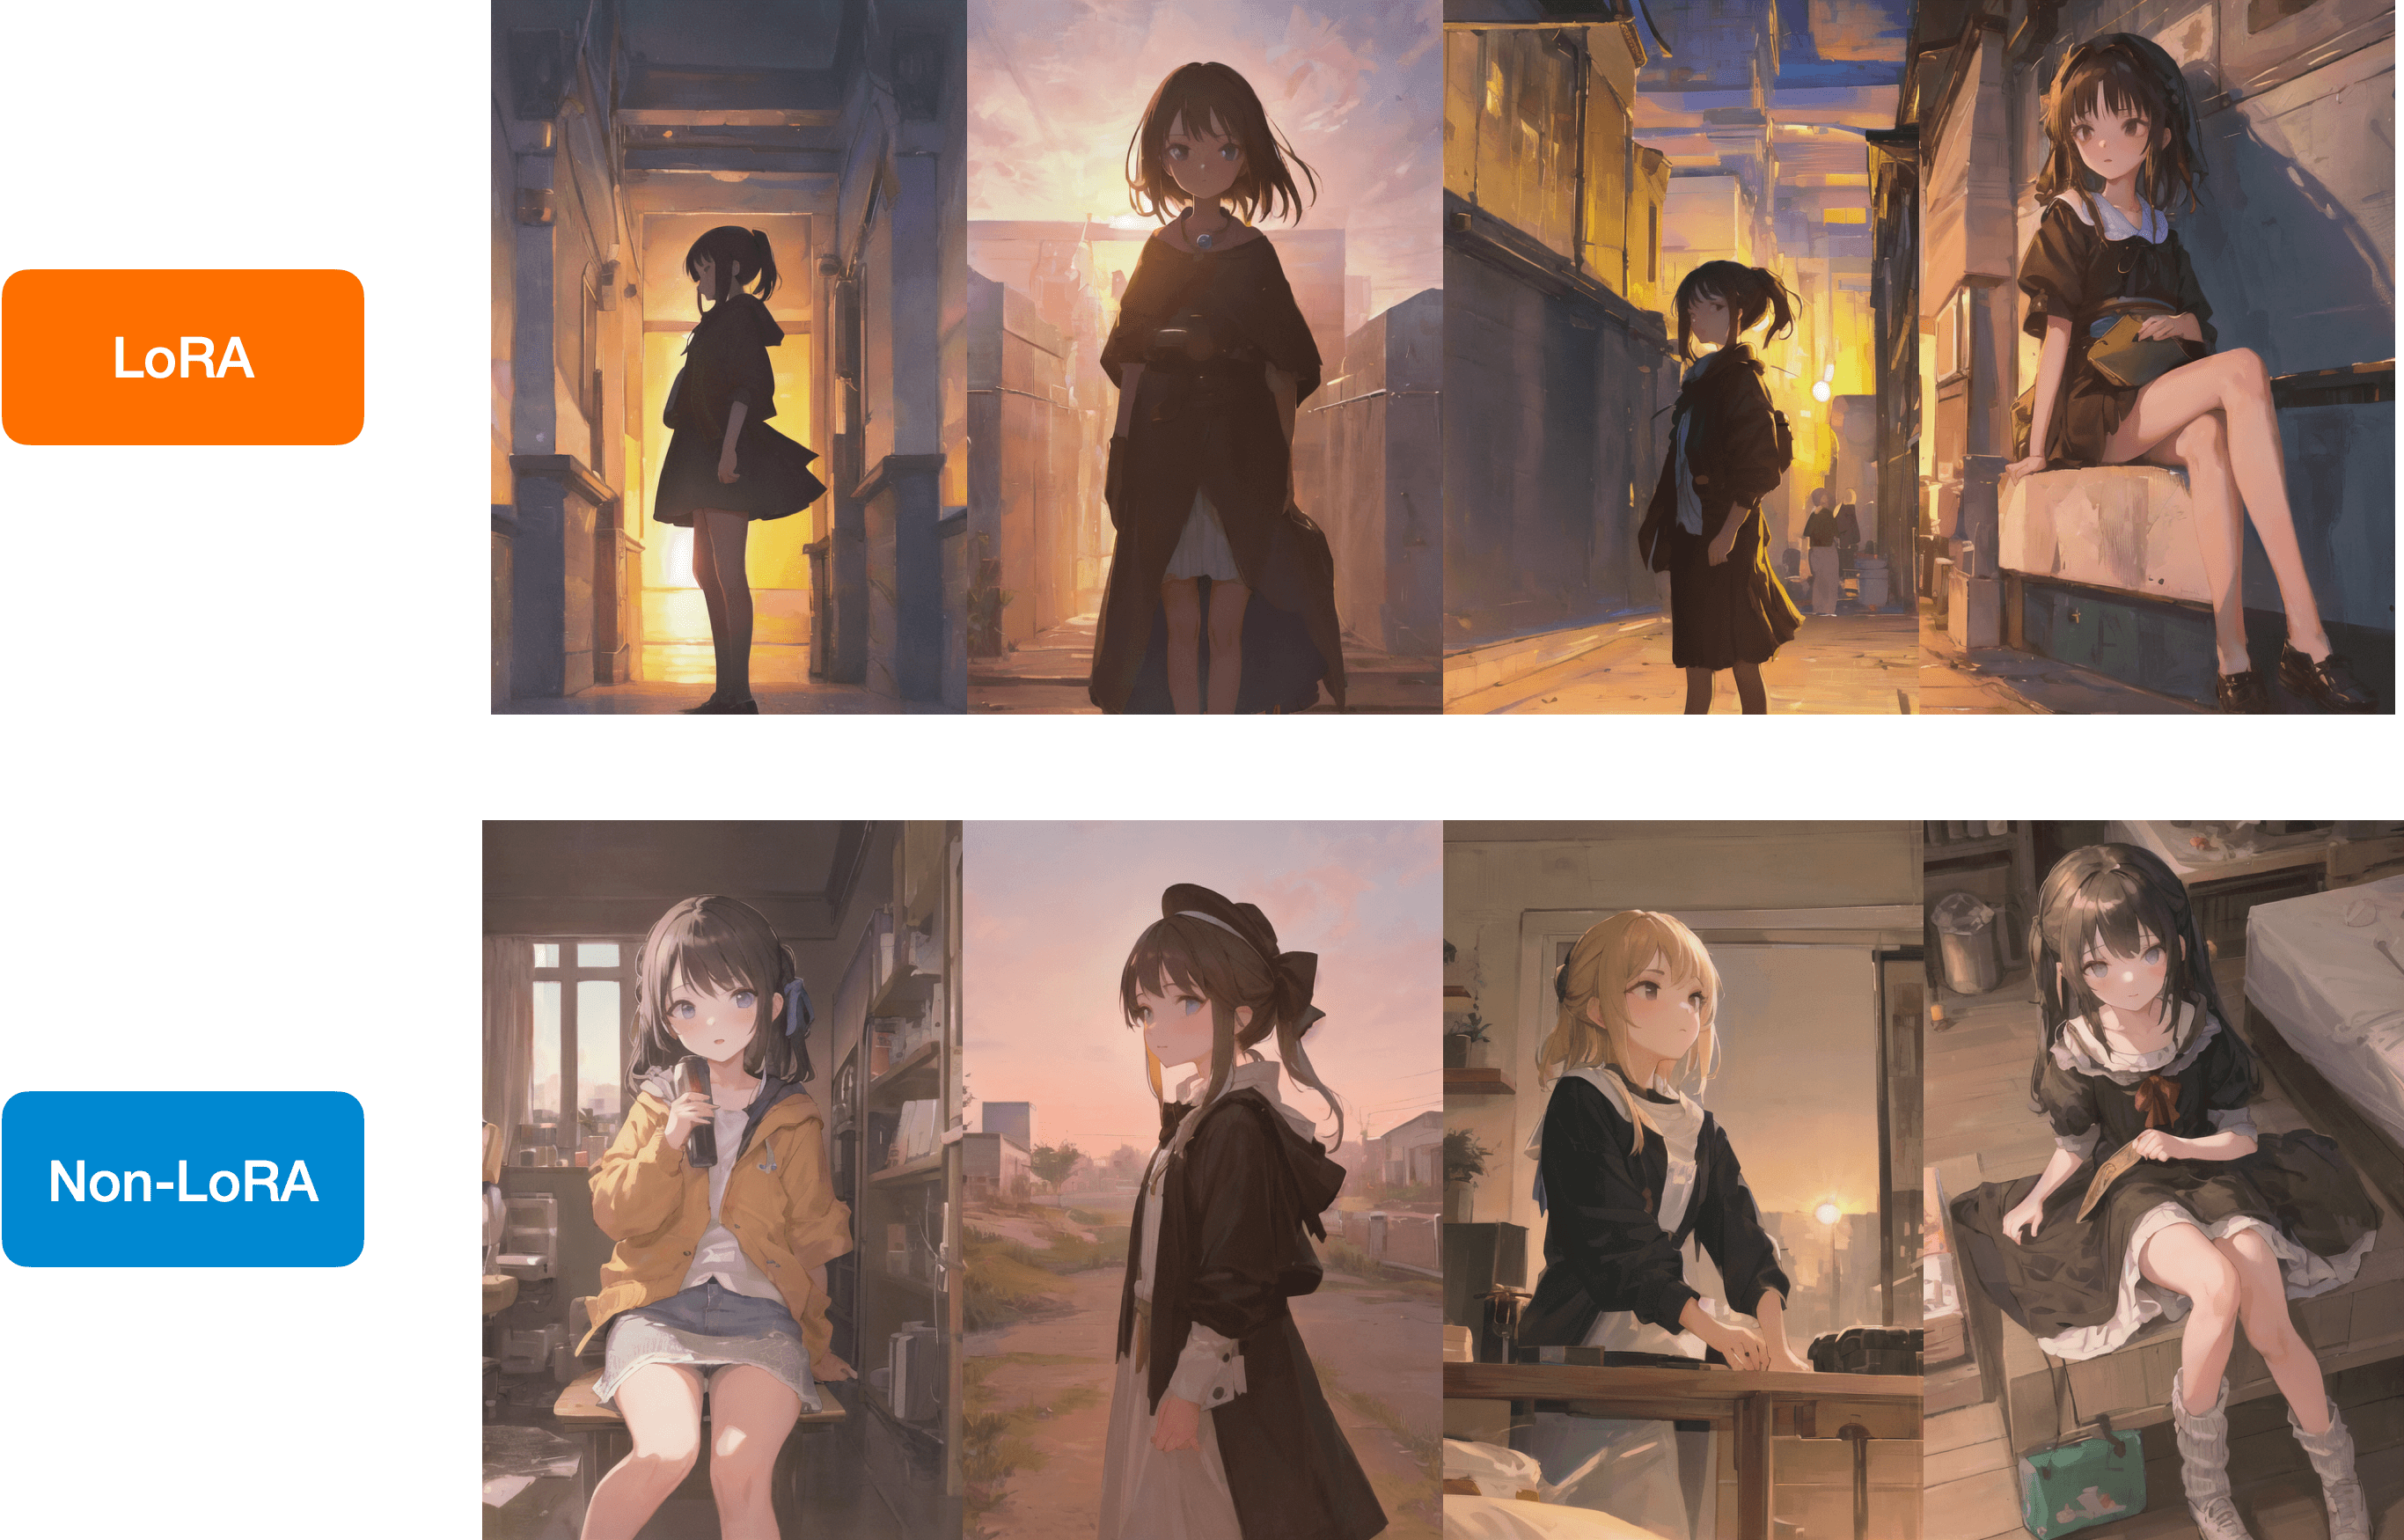
prompt = "masterpiece, best quality, 1girl, at dusk"
negative_prompt = ("(low quality, worst quality:1.4), (bad anatomy), (inaccurate limb:1.2), "
"bad composition, inaccurate eyes, extra digit, fewer digits, (extra arms:1.2), large breasts")
images = pipeline(prompt=prompt,
negative_prompt=negative_prompt,
width=512,
height=768,
num_inference_steps=15,
num_images_per_prompt=4,
generator=torch.manual_seed(0)
).images
```
Below is a comparison between the LoRA and the non-LoRA results:
You have a similar checkpoint stored on the Hugging Face Hub, you can load it
directly with [`~diffusers.loaders.LoraLoaderMixin.load_lora_weights`] like so:
```python
lora_model_id = "sayakpaul/civitai-light-shadow-lora"
lora_filename = "light_and_shadow.safetensors"
pipeline.load_lora_weights(lora_model_id, weight_name=lora_filename)
``` |