PLAPT: Protein-Ligand Binding Affinity Prediction Using Pretrained Transformers
This is the official code repository for PLAPT, a state-of-the-art protein-ligand binding affinity predictor. Preprint
Abstract
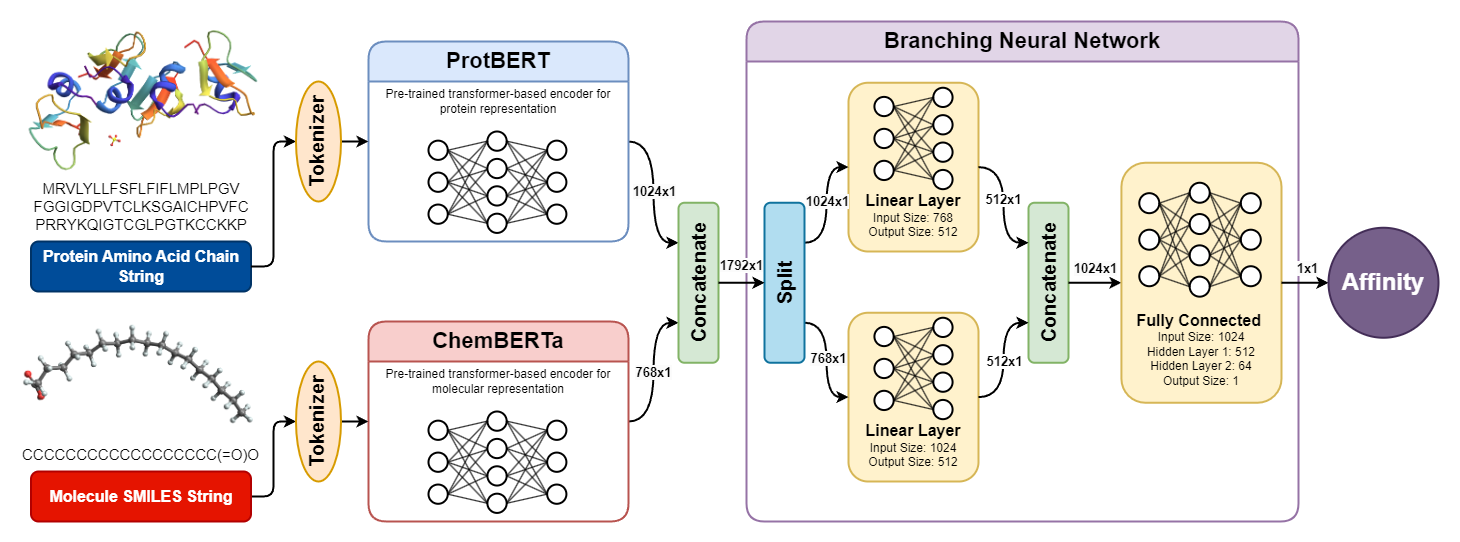
Understanding protein-ligand binding affinity is crucial for drug discovery, enabling the identification of promising drug candidates efficiently. We introduce PLAPT, a novel model leveraging transfer learning from pre-trained transformers like ProtBERT and ChemBERTa to predict binding affinities with high accuracy. Our method processes one-dimensional protein and ligand sequences, leveraging a branching neural network architecture for feature integration and affinity estimation. We demonstrate PLAPT's superior performance through validation on multiple datasets, achieving state-of-the-art results while requiring significantly less computational resources for training compared to existing models. Our findings indicate that PLAPT offers a highly effective and accessible approach for accelerating drug discovery efforts.
Usage
Plapt CLI
Plapt CLI is a command-line interface for the Plapt Python package, designed for predicting affinities using sequences and SMILES strings. This tool is user-friendly and offers flexibility in output formats and file handling.
Prerequisites
Before using Plapt CLI, you need to have the following installed:
- Python (Download and install from python.org)
- Git (Download and install from git-scm.com) - Alternatively, you can download the repository as a ZIP file.
Installation
To install Plapt CLI, you can clone the repository from GitHub:
git clone https://github.com/trrt-good/WELP-PLAPT.git
cd WELP-PLAPT
If you prefer not to use Git, download the ZIP file of the repository and extract it to a desired location.
Once you have the repository on your local machine, install the required dependencies:
pip install -r requirements.txt
(Optional) If you are using a virtual environment, activate it before installing the dependencies:
source /path/to/your/venv/bin/activate
Running the Script
python plapt_cli.py -s SEQ1 SEQ2 ... -m SMILES1 SMILES2 ... -o OUTPUT_FILE -f FORMAT
-s: Followed by one or more sequences.-m: Followed by one or more SMILES strings.-o: (Optional) Path to the output file. If omitted, results are printed to the console.-f: (Optional) Format of the output file (jsonorcsv). Required if-ois used without specifying a file extension.
Examples
To print results to the console:
python plapt_cli.py -s SEQ1 SEQ2 -m SMILES1 SMILES2To save results to a JSON file:
python plapt_cli.py -s SEQ1 SEQ2 -m SMILES1 SMILES2 -o results.jsonTo save results to a CSV file:
python plapt_cli.py -s SEQ1 SEQ2 -m SMILES1 SMILES2 -o results.csvTo specify the format explicitly:
python plapt_cli.py -s SEQ1 SEQ2 -m SMILES1 SMILES2 -o results -f jsonIf
-ois omitted, results are printed to the console.
Using Plapt Directly in Python
Apart from the command-line interface, Plapt can also be used directly in Python scripts. This allows for more flexibility and integration into larger Python projects or workflows.
Installation
Ensure you have followed the installation steps mentioned in the earlier section to set up the Plapt environment and dependencies.
Basic Usage
To use Plapt in a Python script, you need to import the Plapt class and then create an instance of it. You can then call its methods to predict affinities.
Importing and Initializing Plapt
# First, import the Plapt class from the package, making sure you are working in the same directory as the plapt.py file:
from plapt import Plapt

# create an instance of the Plapt class. For basic usage, no initialization parameters are needed:
plapt = Plapt()
Running Predictions
After initializing the Plapt object, you can use it to predict affinities. Here's an example of how to do it:
sequences = ["APTAPSIDMYGSNNL", "PIFLNVLEAIEPGVVC"]
smiles = ["NC(=O)[C@H](CCC(=O)O)", "NC(=[NH2+])c1ccccc1"]

results = plapt.predict_affinity(sequences, smiles)
print(results)
output:
[{'neg_log10_affinity_M': 4.38891527161495, 'affinity_uM': 40.839905489541835}, {'neg_log10_affinity_M': 4.196127195169673, 'affinity_uM': 63.66090450080189}]
The outputted json can subsequently used for other tasks.
Advanced Usage
Plapt can be initialized with specialized parameters, such as the prediction module used, caching, or the inference device. Example below:
from plapt import Plapt

# create an instance of the Plapt class with other parameters:
plapt = Plapt(
    prediction_module_path="models/predictionModule.onnx",  # For using a different prediction module. This is set to "models/predictionModule.onnx" by default.
    caching=True,  # Enable or disable caching. Enabled by default.
    device="cuda"   # Set the computation device ("cuda" for GPU or "cpu" for CPU). If cuda isn't available on your system, it will fallback to "cpu" automatically.
)
Each option can be specified seperately (e.g., plapt = Plapt(caching=False) if you would like to disable caching.
Data Preparation and Encoding
We source protein-ligand pairs and their corresponding affinity values from an open-source binding affinity dataset on hugginface, binding_affinity. We then used ProtBERT and ChemBERTa for encoding proteins and ligands respectively, giving us high quality vector-space representations. The encoding process is detailed in the encoding.ipynb notebook. The dataset, already encoded, is available on our Google Drive for ease of access and use.
Importing Encoders and Running the Notebook
For users to import the encoders and run the Wolfram notebook (WL Notebooks/FinalEssay.nb), we provide the encoders_to_onnx.ipynb notebook. This ensures that users can replicate our encoding process and utilize the full capabilities of PLAPT.
- Downloads last month
- 5


