
| <!--Copyright 2023 The HuggingFace Team. All rights reserved. | |
| Licensed under the Apache License, Version 2.0 (the "License"); you may not use this file except in compliance with | |
| the License. You may obtain a copy of the License at | |
| http://www.apache.org/licenses/LICENSE-2.0 | |
| Unless required by applicable law or agreed to in writing, software distributed under the License is distributed on | |
| an "AS IS" BASIS, WITHOUT WARRANTIES OR CONDITIONS OF ANY KIND, either express or implied. See the License for the | |
| specific language governing permissions and limitations under the License. | |
| --> | |
| # Shap-E | |
| The Shap-E model was proposed in [Shap-E: Generating Conditional 3D Implicit Functions](https://huggingface.co/papers/2305.02463) by Alex Nichol and Heewon Jun from [OpenAI](https://github.com/openai). | |
| The abstract from the paper is: | |
| *We present Shap-E, a conditional generative model for 3D assets. Unlike recent work on 3D generative models which produce a single output representation, Shap-E directly generates the parameters of implicit functions that can be rendered as both textured meshes and neural radiance fields. We train Shap-E in two stages: first, we train an encoder that deterministically maps 3D assets into the parameters of an implicit function; second, we train a conditional diffusion model on outputs of the encoder. When trained on a large dataset of paired 3D and text data, our resulting models are capable of generating complex and diverse 3D assets in a matter of seconds. When compared to Point-E, an explicit generative model over point clouds, Shap-E converges faster and reaches comparable or better sample quality despite modeling a higher-dimensional, multi-representation output space.* | |
| The original codebase can be found at [openai/shap-e](https://github.com/openai/shap-e). | |
| <Tip> | |
| Make sure to check out the Schedulers [guide](/using-diffusers/schedulers) to learn how to explore the tradeoff between scheduler speed and quality, and see the [reuse components across pipelines](/using-diffusers/loading#reuse-components-across-pipelines) section to learn how to efficiently load the same components into multiple pipelines. | |
| </Tip> | |
| ## Usage Examples | |
| In the following, we will walk you through some examples of how to use Shap-E pipelines to create 3D objects in gif format. | |
| ### Text-to-3D image generation | |
| We can use [`ShapEPipeline`] to create 3D object based on a text prompt. In this example, we will make a birthday cupcake for :firecracker: diffusers library's 1 year birthday. The workflow to use the Shap-E text-to-image pipeline is same as how you would use other text-to-image pipelines in diffusers. | |
| ```python | |
| import torch | |
| from diffusers import DiffusionPipeline | |
| device = torch.device("cuda" if torch.cuda.is_available() else "cpu") | |
| repo = "openai/shap-e" | |
| pipe = DiffusionPipeline.from_pretrained(repo, torch_dtype=torch.float16) | |
| pipe = pipe.to(device) | |
| guidance_scale = 15.0 | |
| prompt = ["A firecracker", "A birthday cupcake"] | |
| images = pipe( | |
| prompt, | |
| guidance_scale=guidance_scale, | |
| num_inference_steps=64, | |
| frame_size=256, | |
| ).images | |
| ``` | |
| The output of [`ShapEPipeline`] is a list of lists of images frames. Each list of frames can be used to create a 3D object. Let's use the `export_to_gif` utility function in diffusers to make a 3D cupcake! | |
| ```python | |
| from diffusers.utils import export_to_gif | |
| export_to_gif(images[0], "firecracker_3d.gif") | |
| export_to_gif(images[1], "cake_3d.gif") | |
| ``` | |
|  | |
|  | |
| ### Image-to-Image generation | |
| You can use [`ShapEImg2ImgPipeline`] along with other text-to-image pipelines in diffusers and turn your 2D generation into 3D. | |
| In this example, We will first genrate a cheeseburger with a simple prompt "A cheeseburger, white background" | |
| ```python | |
| from diffusers import DiffusionPipeline | |
| import torch | |
| pipe_prior = DiffusionPipeline.from_pretrained("kandinsky-community/kandinsky-2-1-prior", torch_dtype=torch.float16) | |
| pipe_prior.to("cuda") | |
| t2i_pipe = DiffusionPipeline.from_pretrained("kandinsky-community/kandinsky-2-1", torch_dtype=torch.float16) | |
| t2i_pipe.to("cuda") | |
| prompt = "A cheeseburger, white background" | |
| image_embeds, negative_image_embeds = pipe_prior(prompt, guidance_scale=1.0).to_tuple() | |
| image = t2i_pipe( | |
| prompt, | |
| image_embeds=image_embeds, | |
| negative_image_embeds=negative_image_embeds, | |
| ).images[0] | |
| image.save("burger.png") | |
| ``` | |
| 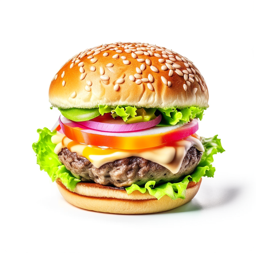 | |
| we will then use the Shap-E image-to-image pipeline to turn it into a 3D cheeseburger :) | |
| ```python | |
| from PIL import Image | |
| from diffusers.utils import export_to_gif | |
| repo = "openai/shap-e-img2img" | |
| pipe = DiffusionPipeline.from_pretrained(repo, torch_dtype=torch.float16) | |
| pipe = pipe.to("cuda") | |
| guidance_scale = 3.0 | |
| image = Image.open("burger.png").resize((256, 256)) | |
| images = pipe( | |
| image, | |
| guidance_scale=guidance_scale, | |
| num_inference_steps=64, | |
| frame_size=256, | |
| ).images | |
| gif_path = export_to_gif(images[0], "burger_3d.gif") | |
| ``` | |
|  | |
| ### Generate mesh | |
| For both [`ShapEPipeline`] and [`ShapEImg2ImgPipeline`], you can generate mesh output by passing `output_type` as `mesh` to the pipeline, and then use the [`ShapEPipeline.export_to_ply`] utility function to save the output as a `ply` file. We also provide a [`ShapEPipeline.export_to_obj`] function that you can use to save mesh outputs as `obj` files. | |
| ```python | |
| import torch | |
| from diffusers import DiffusionPipeline | |
| from diffusers.utils import export_to_ply | |
| device = torch.device("cuda" if torch.cuda.is_available() else "cpu") | |
| repo = "openai/shap-e" | |
| pipe = DiffusionPipeline.from_pretrained(repo, torch_dtype=torch.float16, variant="fp16") | |
| pipe = pipe.to(device) | |
| guidance_scale = 15.0 | |
| prompt = "A birthday cupcake" | |
| images = pipe(prompt, guidance_scale=guidance_scale, num_inference_steps=64, frame_size=256, output_type="mesh").images | |
| ply_path = export_to_ply(images[0], "3d_cake.ply") | |
| print(f"saved to folder: {ply_path}") | |
| ``` | |
| Huggingface Datasets supports mesh visualization for mesh files in `glb` format. Below we will show you how to convert your mesh file into `glb` format so that you can use the Dataset viewer to render 3D objects. | |
| We need to install `trimesh` library. | |
| ``` | |
| pip install trimesh | |
| ``` | |
| To convert the mesh file into `glb` format, | |
| ```python | |
| import trimesh | |
| mesh = trimesh.load("3d_cake.ply") | |
| mesh.export("3d_cake.glb", file_type="glb") | |
| ``` | |
| By default, the mesh output of Shap-E is from the bottom viewpoint; you can change the default viewpoint by applying a rotation transformation | |
| ```python | |
| import trimesh | |
| import numpy as np | |
| mesh = trimesh.load("3d_cake.ply") | |
| rot = trimesh.transformations.rotation_matrix(-np.pi / 2, [1, 0, 0]) | |
| mesh = mesh.apply_transform(rot) | |
| mesh.export("3d_cake.glb", file_type="glb") | |
| ``` | |
| Now you can upload your mesh file to your dataset and visualize it! Here is the link to the 3D cake we just generated | |
| https://huggingface.co/datasets/hf-internal-testing/diffusers-images/blob/main/shap_e/3d_cake.glb | |
| ## ShapEPipeline | |
| [[autodoc]] ShapEPipeline | |
| - all | |
| - __call__ | |
| ## ShapEImg2ImgPipeline | |
| [[autodoc]] ShapEImg2ImgPipeline | |
| - all | |
| - __call__ | |
| ## ShapEPipelineOutput | |
| [[autodoc]] pipelines.shap_e.pipeline_shap_e.ShapEPipelineOutput |