MCP Course documentation
Webhook Listener
Webhook Listener
The webhook listener is the entry point for our Pull Request Agent. It receives real-time events from the Hugging Face Hub when discussions are created or updated, triggering our MCP-powered tagging workflow. In this section, we’ll implement a webhook handler using FastAPI.
Understanding Webhook Integration
Following the Hugging Face Webhooks Guide, our webhook listener validates incoming requests and processes discussion events in real-time.
Webhook Event Flow
Understanding the webhook flow is crucial for building a reliable listener:
- User Action: Someone creates a comment in a model repository discussion
- Hub Event: Hugging Face generates a webhook event
- Webhook Delivery: Hub sends POST request to our endpoint
- Authentication: We validate the webhook secret
- Processing: Extract tags from the comment content
- Action: Use MCP tools to create pull requests for new tags
Webhooks are push notifications - the Hugging Face Hub actively sends events to your application rather than you polling for changes. This enables real-time responses to discussions and comments.
FastAPI Webhook Application
Let’s build our webhook listener step by step, starting with the foundation and building up to the complete processing logic.
1. Application Setup
First, let’s set up the basic FastAPI application with all necessary imports and configuration:
import os
import json
from datetime import datetime
from typing import List, Dict, Any, Optional

from fastapi import FastAPI, Request, BackgroundTasks
from fastapi.middleware.cors import CORSMiddleware
from pydantic import BaseModel
These imports give us everything we need to build a robust webhook handler. FastAPI provides the web framework, BackgroundTasks enables async processing, and the typing imports help with data validation.
Now let’s configure our application:
# Configuration
WEBHOOK_SECRET = os.getenv("WEBHOOK_SECRET")
HF_TOKEN = os.getenv("HF_TOKEN")

# Simple storage for processed operations
tag_operations_store: List[Dict[str, Any]] = []

app = FastAPI(title="HF Tagging Bot")
app.add_middleware(CORSMiddleware, allow_origins=["*"])
This configuration sets up:
- Webhook secret: For validating incoming webhooks
- HF token: For authenticating with the Hub API
- Operations store: In-memory storage for monitoring processed operations
- CORS middleware: Allows cross-origin requests for the web interface
2. Webhook Data Models
Based on the Hugging Face webhook documentation, we need to understand the webhook data structure:
class WebhookEvent(BaseModel):
    event: Dict[str, str]          # Contains action and scope information
    comment: Dict[str, Any]        # Comment content and metadata
    discussion: Dict[str, Any]     # Discussion information
    repo: Dict[str, str]           # Repository details
This Pydantic model helps us understand the webhook structure.
The key fields we care about are:
event.action: Usually “create” for new commentsevent.scope: Usually “discussion.comment” for comment eventscomment.content: The actual comment textrepo.name: The repository where the comment was made
3. Core Webhook Handler
Now for the main webhook handler - this is where the important part happens. Let’s break it down into digestible pieces:
@app.post("/webhook")
async def webhook_handler(request: Request, background_tasks: BackgroundTasks):
    """
    Handle incoming webhooks from Hugging Face Hub
    Following the pattern from: https://raw.githubusercontent.com/huggingface/hub-docs/refs/heads/main/docs/hub/webhooks-guide-discussion-bot.md
    """
    print("🔔 Webhook received!")

    # Step 1: Validate webhook secret (security)
    webhook_secret = request.headers.get("X-Webhook-Secret")
    if webhook_secret != WEBHOOK_SECRET:
        print("❌ Invalid webhook secret")
        return {"error": "incorrect secret"}, 400
The first step is security validation. We check the X-Webhook-Secret header against our configured secret to ensure the webhook is legitimate.
Always validate webhook secrets! Without this check, anyone could send fake webhook requests to your application. The secret acts as a shared password between Hugging Face and your application.
Next, let’s parse and validate the webhook data:
    # Step 2: Parse webhook data
    try:
        webhook_data = await request.json()
        print(f"📥 Webhook data: {json.dumps(webhook_data, indent=2)}")
    except Exception as e:
        print(f"❌ Error parsing webhook data: {str(e)}")
        return {"error": "invalid JSON"}, 400

    # Step 3: Validate event structure
    event = webhook_data.get("event", {})
    if not event:
        print("❌ No event data in webhook")
        return {"error": "missing event data"}, 400
This parsing step handles potential JSON errors gracefully and validates that we have the expected event structure.
Now for the event filtering logic:
    # Step 4: Check if this is a discussion comment creation
    # Following the webhook guide pattern:
    if (
        event.get("action") == "create" and
        event.get("scope") == "discussion.comment"
    ):
        print("✅ Valid discussion comment creation event")

        # Process in background to return quickly to Hub
        background_tasks.add_task(process_webhook_comment, webhook_data)

        return {
            "status": "accepted",
            "message": "Comment processing started",
            "timestamp": datetime.now().isoformat()
        }
    else:
        print(f"ℹ️ Ignoring event: action={event.get('action')}, scope={event.get('scope')}")
        return {
            "status": "ignored",
            "reason": "Not a discussion comment creation"
        }
This filtering ensures we only process the events we care about - new discussion comments. We ignore other events like repository creation, model uploads, etc.
We use FastAPI’s background_tasks.add_task() to process the webhook asynchronously. This allows us to return a response quickly (within seconds) while the actual tag processing happens in the background.
Webhook endpoints should respond within 10 seconds, or the sending platform may consider them failed. Using background tasks ensures fast responses while allowing complex processing to happen asynchronously.
4. Comment Processing Logic
Now let’s implement the core comment processing function that does the actual tag extraction and MCP tool usage:
async def process_webhook_comment(webhook_data: Dict[str, Any]):
    """
    Process webhook comment to detect and add tags
    Integrates with our MCP client for Hub interactions
    """
    print("🏷️ Starting process_webhook_comment...")

    try:
        # Extract comment and repository information
        comment_content = webhook_data["comment"]["content"]
        discussion_title = webhook_data["discussion"]["title"]
        repo_name = webhook_data["repo"]["name"]
        discussion_num = webhook_data["discussion"]["num"]
        comment_author = webhook_data["comment"]["author"].get("id", "unknown")

        print(f"📝 Comment from {comment_author}: {comment_content}")
        print(f"📰 Discussion: {discussion_title}")
        print(f"📦 Repository: {repo_name}")
This initial section extracts all the relevant information from the webhook data. We get both the comment content and discussion title since tags might be mentioned in either place.
Next, we extract and process the tags:
        # Extract potential tags from comment and title
        comment_tags = extract_tags_from_text(comment_content)
        title_tags = extract_tags_from_text(discussion_title)
        all_tags = list(set(comment_tags + title_tags))

        print(f"🔍 Found tags: {all_tags}")

        # Store operation for monitoring
        operation = {
            "timestamp": datetime.now().isoformat(),
            "repo_name": repo_name,
            "discussion_num": discussion_num,
            "comment_author": comment_author,
            "extracted_tags": all_tags,
            "comment_preview": comment_content[:100] + "..." if len(comment_content) > 100 else comment_content,
            "status": "processing"
        }
        tag_operations_store.append(operation)
We combine tags from both sources and create an operation record for monitoring. This record tracks the progress of each webhook processing operation.
Storing operation records is crucial for debugging and monitoring. When something goes wrong, you can look at recent operations to understand what happened and why.
Now for the MCP agent integration:
        if not all_tags:
            operation["status"] = "no_tags"
            operation["message"] = "No recognizable tags found"
            print("❌ No tags found to process")
            return

        # Get MCP agent for tag processing
        agent = await get_agent()
        if not agent:
            operation["status"] = "error"
            operation["message"] = "Agent not configured (missing HF_TOKEN)"
            print("❌ No agent available")
            return

        # Process each extracted tag
        operation["results"] = []
        for tag in all_tags:
            try:
                print(f"🤖 Processing tag '{tag}' for repo '{repo_name}'")

                # Create prompt for agent to handle tag processing
                prompt = f"""
                Analyze the repository '{repo_name}' and determine if the tag '{tag}' should be added.

                First, check the current tags using get_current_tags.
                If '{tag}' is not already present and it's a valid tag, add it using add_new_tag.

                Repository: {repo_name}
                Tag to process: {tag}

                Provide a clear summary of what was done.
                """

                response = await agent.run(prompt)
                print(f"🤖 Agent response for '{tag}': {response}")

                # Parse response and store result
                tag_result = {
                    "tag": tag,
                    "response": response,
                    "timestamp": datetime.now().isoformat()
                }
                operation["results"].append(tag_result)

            except Exception as e:
                error_msg = f"❌ Error processing tag '{tag}': {str(e)}"
                print(error_msg)
                operation["results"].append({
                    "tag": tag,
                    "error": str(e),
                    "timestamp": datetime.now().isoformat()
                })

        operation["status"] = "completed"
        print(f"✅ Completed processing {len(all_tags)} tags")
This section handles the core business logic:
- Validation: Ensure we have tags to process and an available agent
- Processing: For each tag, create a natural language prompt for the agent
- Recording: Store all results for monitoring and debugging
- Error handling: Gracefully handle errors for individual tags
The agent prompt is carefully crafted to instruct the AI on exactly what steps to take: check current tags first, then add the new tag if appropriate.
5. Health and Monitoring Endpoints
Besides the webhook handler, we need endpoints for monitoring and debugging. Let’s add these essential endpoints:
@app.get("/")
async def root():
    """Root endpoint with basic information"""
    return {
        "name": "HF Tagging Bot",
        "status": "running",
        "description": "Webhook listener for automatic model tagging",
        "endpoints": {
            "webhook": "/webhook",
            "health": "/health",
            "operations": "/operations"
        }
    }
The root endpoint provides basic information about your service and its available endpoints.
@app.get("/health")
async def health_check():
    """Health check endpoint for monitoring"""
    agent = await get_agent()

    return {
        "status": "healthy",
        "timestamp": datetime.now().isoformat(),
        "components": {
            "webhook_secret": "configured" if WEBHOOK_SECRET else "missing",
            "hf_token": "configured" if HF_TOKEN else "missing",
            "mcp_agent": "ready" if agent else "not_ready"
        }
    }
The health check endpoint validates that all your components are properly configured. This is essential for production monitoring.
@app.get("/operations")
async def get_operations():
    """Get recent tag operations for monitoring"""
    # Return last 50 operations
    recent_ops = tag_operations_store[-50:] if tag_operations_store else []
    return {
        "total_operations": len(tag_operations_store),
        "recent_operations": recent_ops
    }
The operations endpoint lets you see recent webhook processing activity, which is invaluable for debugging and monitoring.
Health and monitoring endpoints are crucial for production deployments. They help you quickly identify configuration issues and monitor your application’s activity without digging through logs.
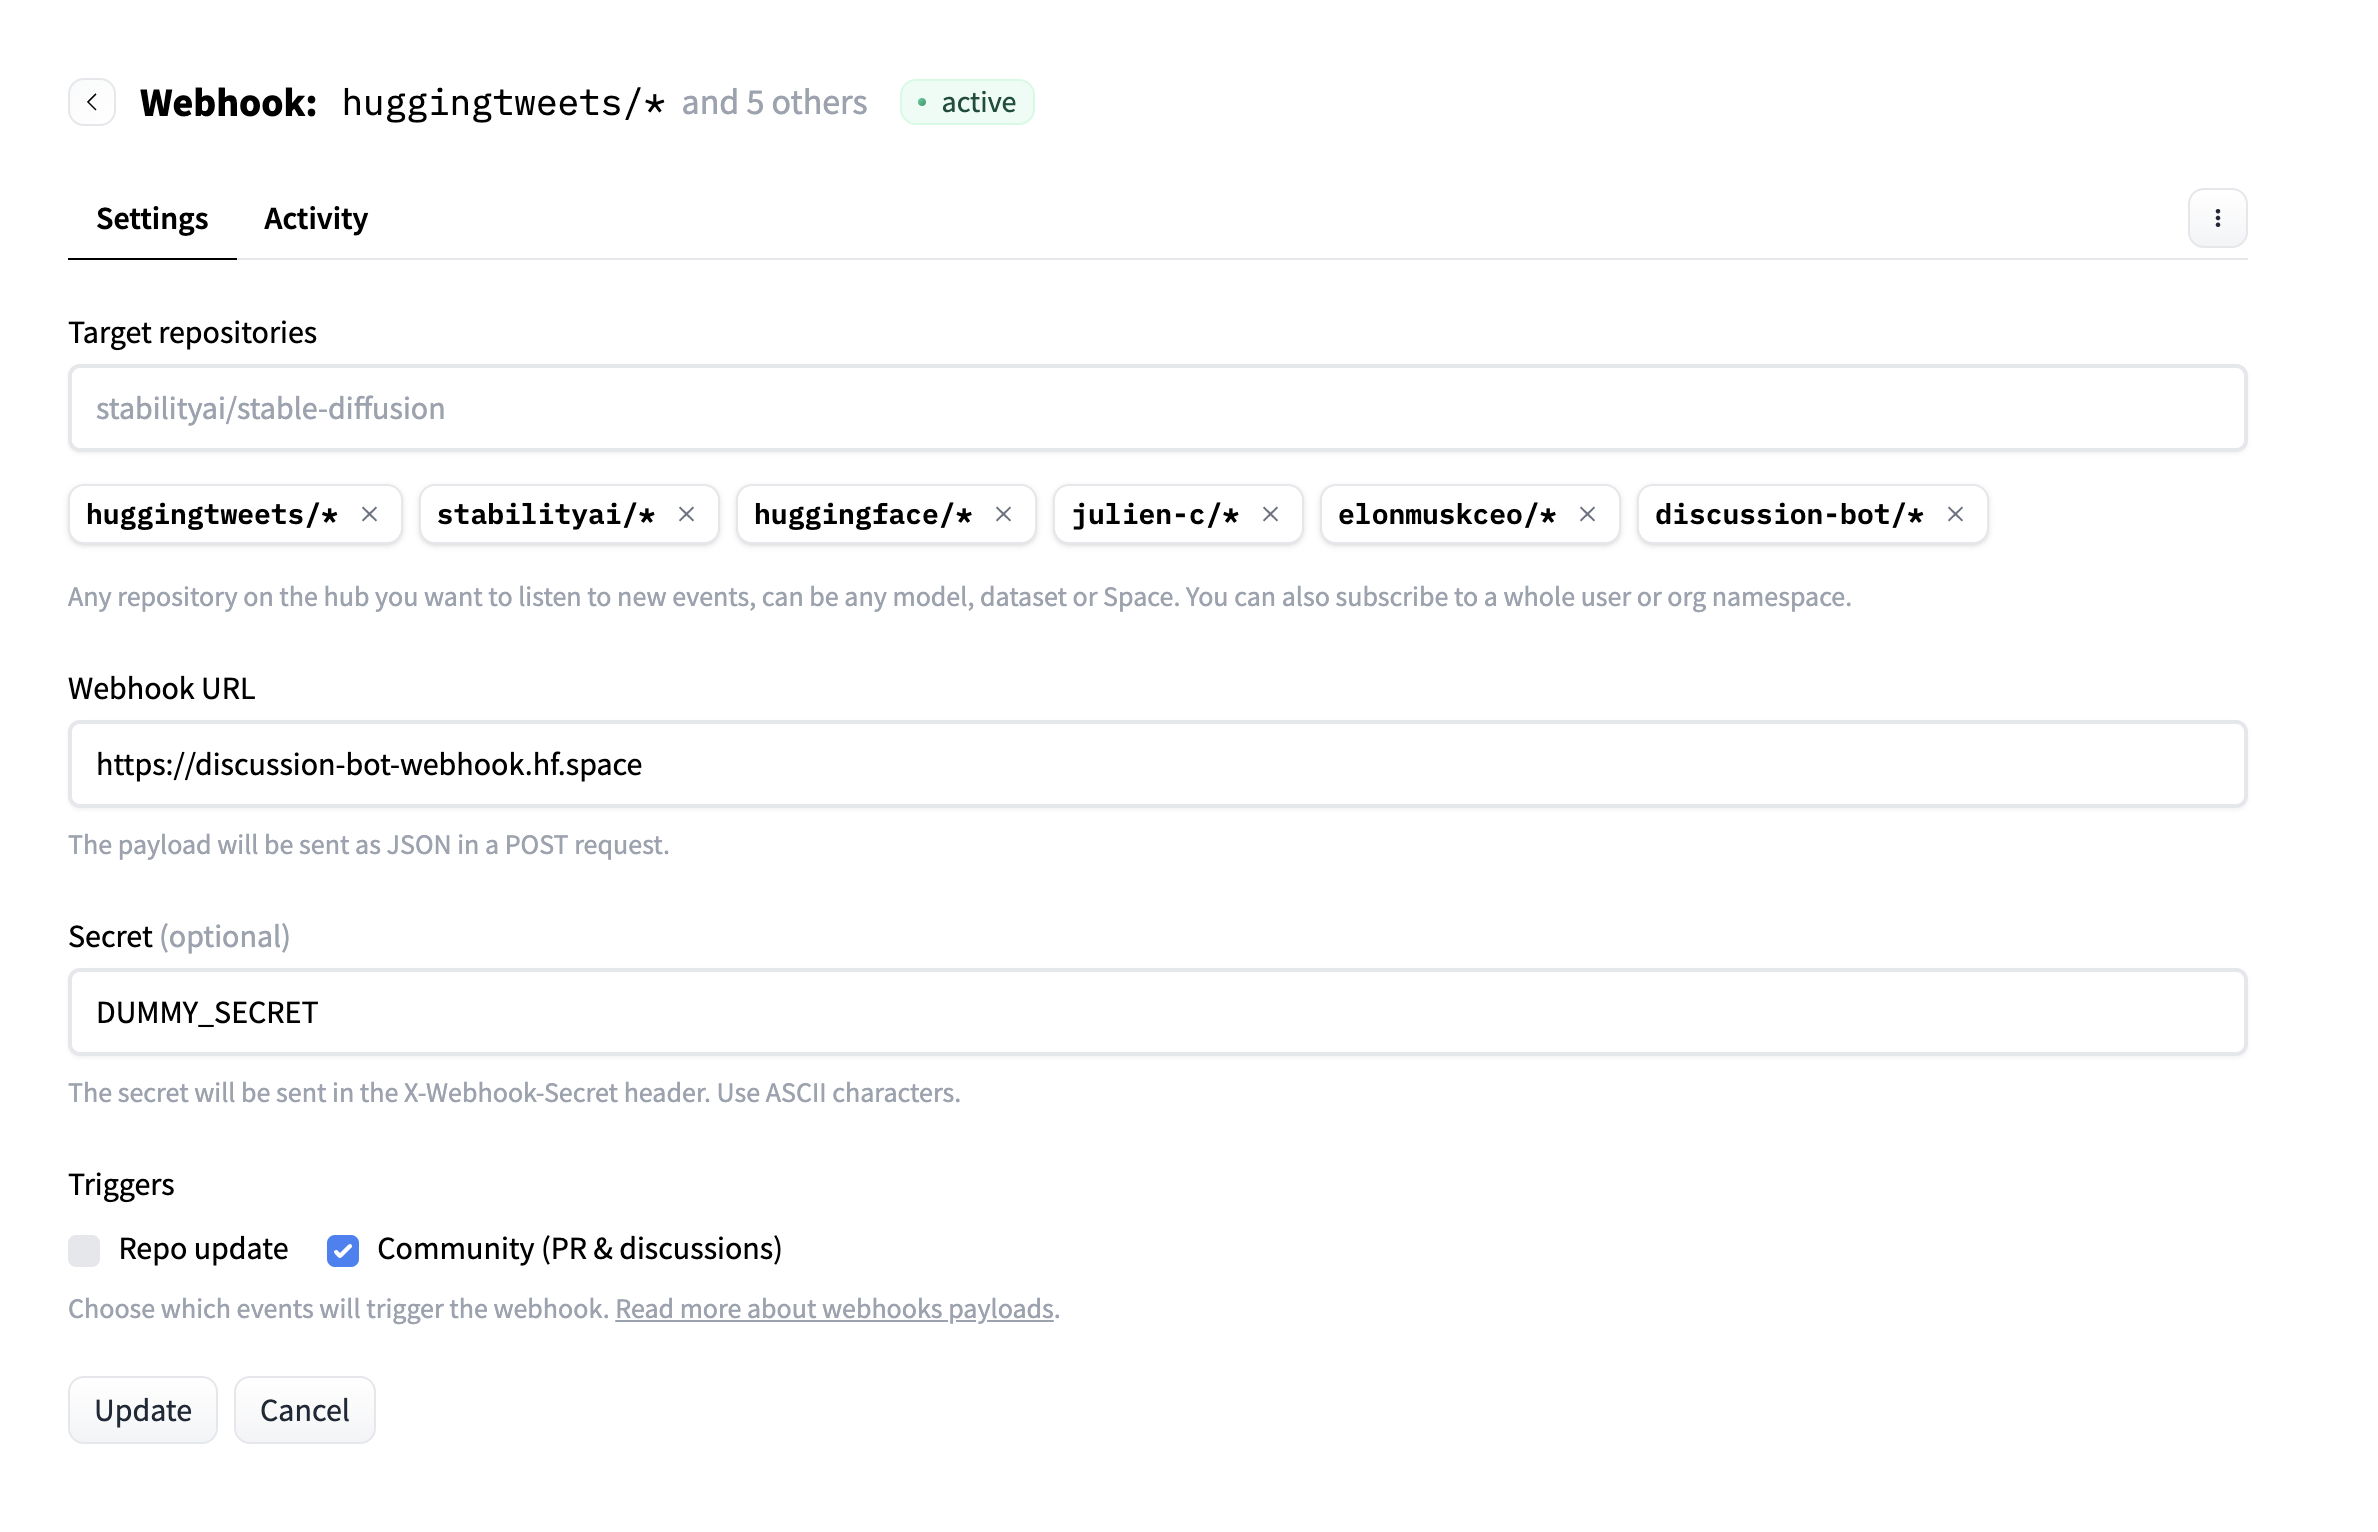
Webhook Configuration on Hugging Face Hub
Now that we have our webhook listener ready, let’s configure it on the Hugging Face Hub. This is where we connect our application to real repository events.
1. Create Webhook in Settings
Following the webhook setup guide:
Navigate to your Hugging Face Settings and configure:
- Target Repositories: Specify which repositories to monitor
- Webhook URL: Your deployed application endpoint (e.g.,
https://your-space.hf.space/webhook) - Secret: Use the same secret from your
WEBHOOK_SECRETenvironment variable - Events: Subscribe to “Community (PR & discussions)” events
Start with one or two test repositories before configuring webhooks for many repositories. This lets you validate your application works correctly before scaling up.
2. Space URL Configuration
For Hugging Face Spaces deployment, you’ll need to get your direct URL:
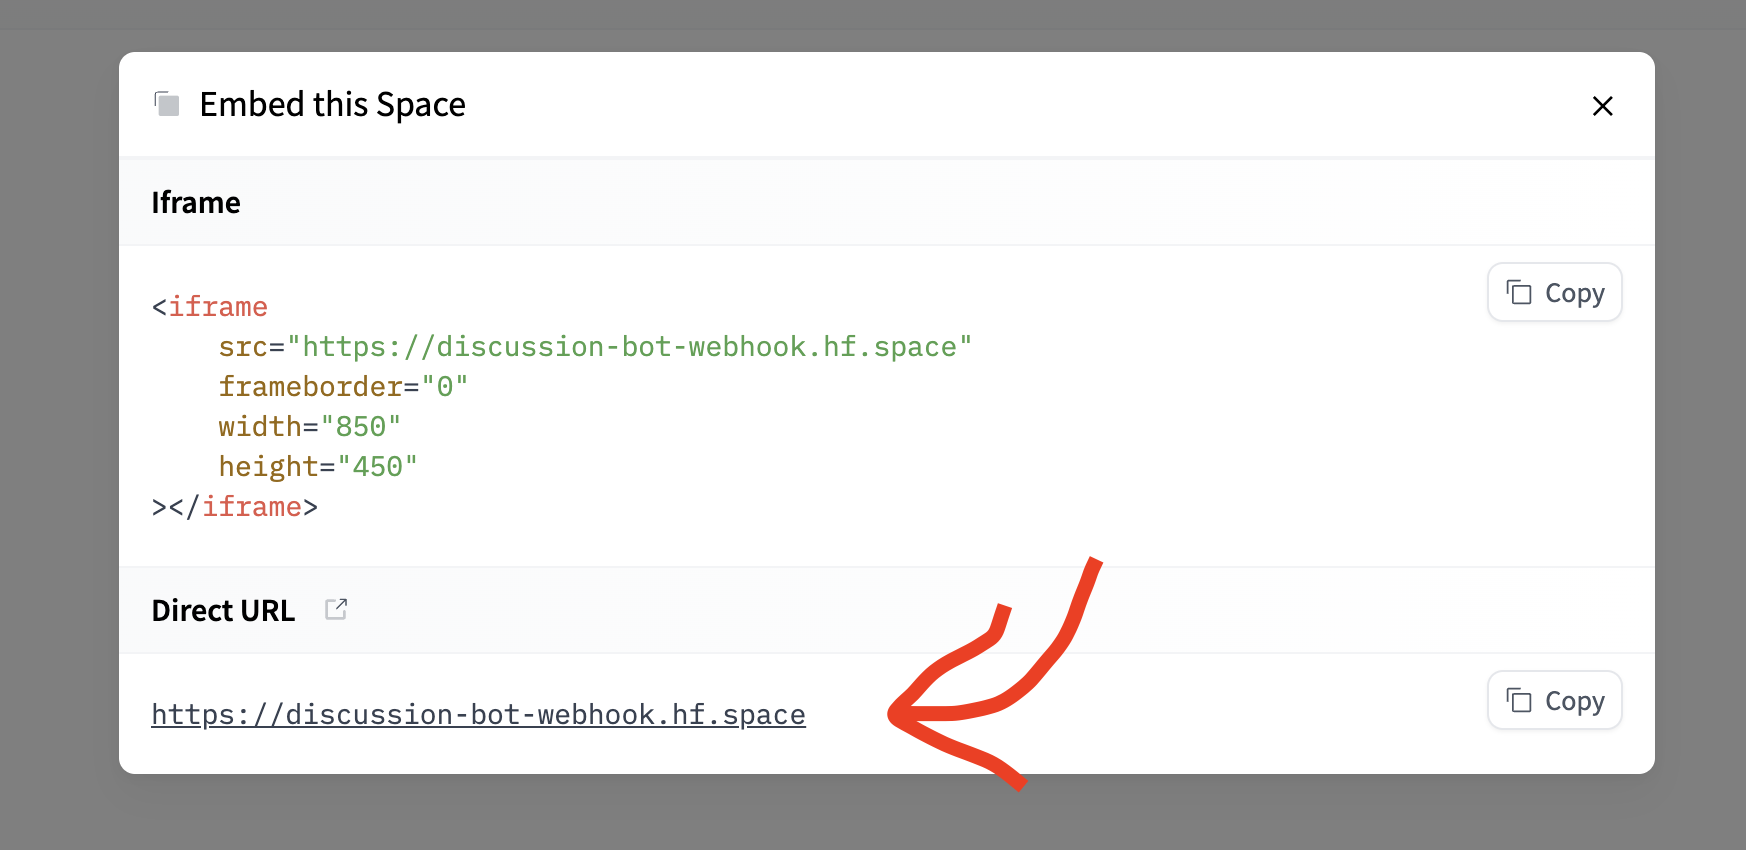
The process is:
- Click “Embed this Space” in your Space settings
- Copy the “Direct URL”
- Append
/webhookto create your webhook endpoint - Update your webhook configuration with this URL
For example, if your Space URL is https://username-space-name.hf.space, your webhook endpoint would be https://username-space-name.hf.space/webhook.
Testing the Webhook Listener
Testing is crucial before deploying to production. Let’s walk through different testing approaches:
1. Local Testing
You can test your webhook handler locally using a simple script:
# test_webhook_local.py
import requests
import json

# Test data matching webhook format
test_webhook_data = {
    "event": {
        "action": "create",
        "scope": "discussion.comment"
    },
    "comment": {
        "content": "This model needs tags: pytorch, transformers",
        "author": {"id": "test-user"}
    },
    "discussion": {
        "title": "Missing tags",
        "num": 1
    },
    "repo": {
        "name": "test-user/test-model"
    }
}

# Send test webhook
response = requests.post(
    "http://localhost:8000/webhook",
    json=test_webhook_data,
    headers={"X-Webhook-Secret": "your-test-secret"}
)

print(f"Status: {response.status_code}")
print(f"Response: {response.json()}")
This script simulates a real webhook request, allowing you to test your handler without waiting for real events.
2. Simulation Endpoint for Development
You can also add a simulation endpoint to your FastAPI application for easier testing:
@app.post("/simulate_webhook")
async def simulate_webhook(
    repo_name: str,
    discussion_title: str,
    comment_content: str
) -> str:
    """Simulate webhook for testing purposes"""

    # Create mock webhook data
    mock_webhook_data = {
        "event": {
            "action": "create",
            "scope": "discussion.comment"
        },
        "comment": {
            "content": comment_content,
            "author": {"id": "test-user"}
        },
        "discussion": {
            "title": discussion_title,
            "num": 999
        },
        "repo": {
            "name": repo_name
        }
    }

    # Process the simulated webhook
    await process_webhook_comment(mock_webhook_data)

    return f"Simulated webhook processed for {repo_name}"
This endpoint makes it easy to test different scenarios through your application’s interface.
Expected Webhook Result
When everything is working correctly, you should see results like the discussion bot example:

This screenshot shows a successful webhook processing where the bot creates a pull request in response to a discussion comment.
Next Steps
With our webhook listener implemented, we now have:
- Secure webhook validation following Hugging Face best practices
- Real-time event processing with background task handling
- MCP integration for intelligent tag management
- Monitoring and debugging capabilities
In the next section, we’ll integrate everything into a complete Pull Request Agent that demonstrates the full workflow from webhook to PR creation.
Always return webhook responses quickly (within 10 seconds) to avoid timeouts. Use background tasks for longer processing operations like MCP tool execution and pull request creation.